Thursday, June 13, 2013
Install 24pin and 8pin cables on Pro Series Gold PSU
Install 24pin and 8pin cables on Pro Series Gold PSU
This tutorial shows the proper way to install 24pin and 8pin cables on the Professional Series Gold PSUs.
When it comes to excellent performance, quality, reliability, and energy-efficiency, Corsair power supply units (PSUs) are the solution. With a new standard, Corsair Professional Series™ Gold power supplies are completely modular, one of the best features of the AX series.
In this tutorial, you will be shown how to install and connect the 24pins and 8pins cables available on the following Corsair Professional Series Gold PSUs: AX750, AX850 and AX1200.
Install 24pin and 8pin cables on Pro Series Gold PSU #1
What comes with the AX Series PSU
First, be sure that you have the following along with your power supply (the amount of cables varies with the model of your PSU):
1. Corsair AX PSU with protective pouch
2. Cables with carrying bag (amount of cables varies on which model purchased)
3. Users manual
4. Power cable
5. Tie straps/screws to mount PSU to case/case badge

Install 24pin and 8pin cables on Pro Series Gold PSU #2
Understand the connectors
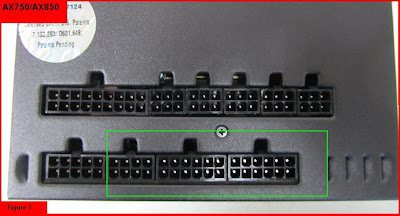
The picture below shows the basic design for the AX750/AX850 and AX1200 PSUs. Understand what each group indicated is:
1. Boxed in yellow: 24 Pin connector (both connectors will need to be plugged)
2. Boxed in blue: Peripherals and SATA cables
3. Boxed in Green: EPS connector and PCI E connector

Install 24pin and 8pin cables on Pro Series Gold PSU #3
24pin cables connections
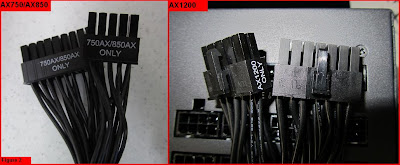
As you can see in the below picture, all the cables are labeled to clearly indicate with which power supply they can be used. The correct way to plug the cables is also indicated. Some cables are labeled to specific models only.

The power supplies are normally designed to have 20-24 pin connectors, depending on the requirements of the motherboard. So, if you require only 20 pins, leave the remaining 4 pins (2x2) hanging to the side, and do not try to use these for the EPS 12v connection.
Install 24pin and 8pin cables on Pro Series Gold PSU #4
8/4 pin and PCI-E connectors
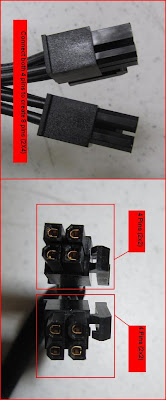
The power supplies come with different EPS 12v 8/4 pin connectors. If you take a look at the AX1200 model, you will see that they come in a form factor of 8 pins (2x4), and are labeled as “4-4 CPU”. The AX750 and AX850 are slightly different, and come in two different layouts; an 8 pin and two 12 pin plugs. The 8 pin plug is designed only for the EPS 12v connector while the other two 12 pins are used for the PCI-E connectors.

After correctly installing the cables to the power supply unit, plug the other end into the socket of the motherboard. The EPS 12v connector will either require an 8 pin or 4 pin connections, depending on the motherboard. But that`s not a problem as the Corsair power supplies come with both. Connecting the two 4 pins would give you an 8 pin connector if your motherboard requires it, if not; you can use the 4 pin connectors.

Now, once completed, be sure to check everything again to ensure you have done nothing wrong. Then, you can start and enjoy your system.

This tutorial was originally made by Carlos Pascual on the 18th May 2011 at Corsair. All credits go to them. Also, I would like to thanks these guys there (unfortunately, I had problem commenting there) for the excellent tutorials they provide us. They are among the very few to provide such helps and advices to us.